How to Install Garmin Livescope
To install Garmin Livescope, mount the transducer as close to the center line of the boat as possible, avoiding the path of the propeller. Make sure the transducer is securely attached and doesn’t interfere with the sonar beam.
Additionally, consider using a Ram mount for better stability and choose a suitable location for the graph display. For a step-by-step guide, watch the video “Installing Garmin Livescope | What You Need to Know” on YouTube. Following these instructions will ensure optimal performance and prevent damage to your boat.
Credit: www.crappie.com
Introduction To Garmin Livescope
Garmin Livescope is a revolutionary technology that provides real-time sonar imaging, allowing anglers to see fish and structures under the water with exceptional clarity. With Livescope, you can gain a competitive edge in fishing by accurately pinpointing the location of fish and adjusting your strategy accordingly. Additionally, installing Garmin Livescope on your boat offers numerous benefits, including enhanced fishing efficiency, improved catch rates, and a more enjoyable fishing experience. Whether you are a professional angler or a recreational fisherman, Garmin Livescope can revolutionize the way you approach fishing.
Credit: m.youtube.com
Installing Garmin Livescope
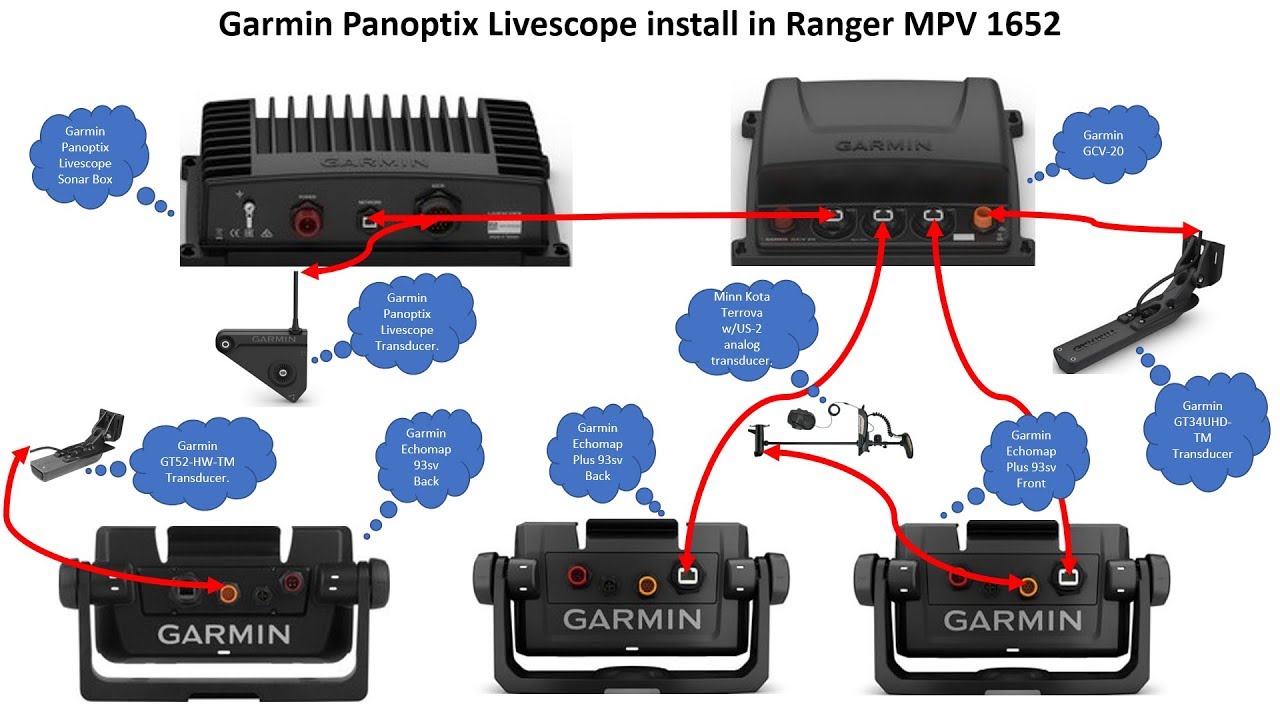
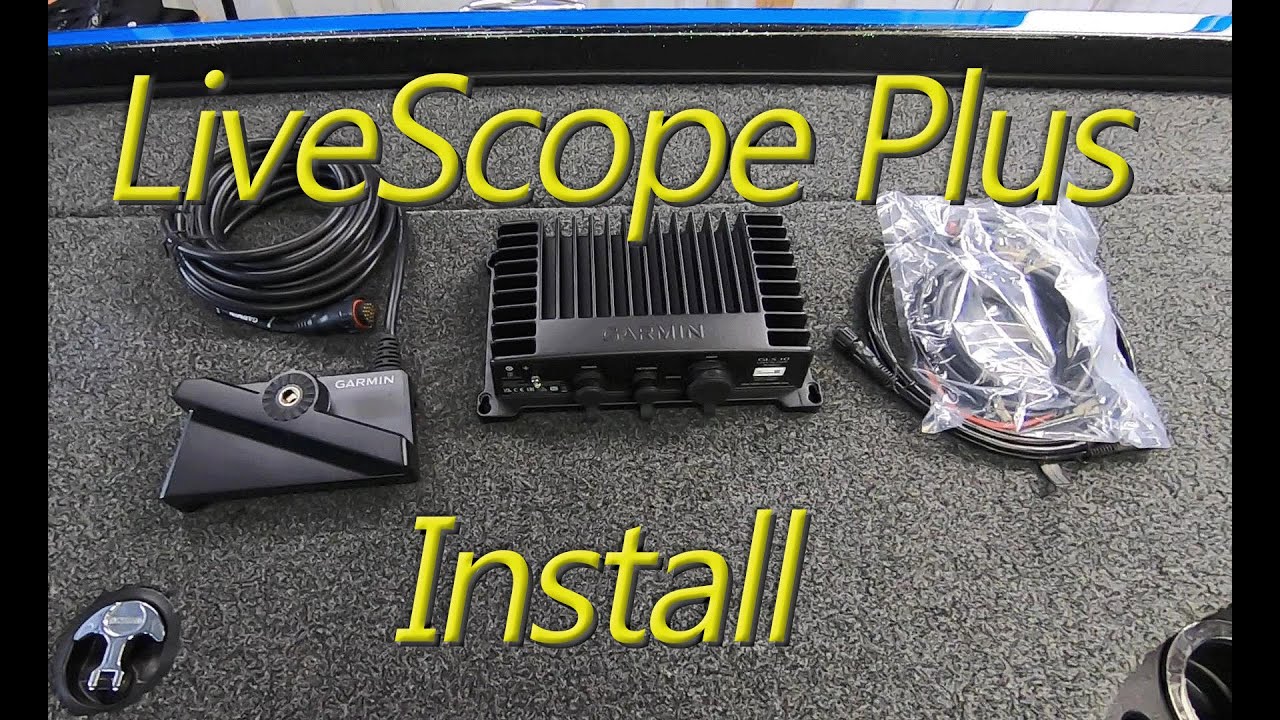
Installing Garmin Livescope on your boat is a straightforward process that requires a few essential components and careful installation. First, you’ll need a cable extension to connect the Livescope transducer to your display unit. This ensures that you have enough length to reach your desired location. A fish tape and wire will come in handy for threading the cable through tight spaces on your boat. Once you have the cable extended, you can proceed to attach the transducer cable to your boat using appropriate mounting options. Finally, the Ram mount provides a secure and stable platform for your Livescope display. Mount the transducer as close to the center line of the boat as possible to avoid interference with the sonar beam. This ensures consistent detection on both sides of the boat. Following these installation steps will allow you to enjoy the benefits of Garmin Livescope on your fishing adventures.
Transducer Mounting Options
You should mount the transducer as close to the center line of the boat as possible. This will help avoid interference with the sonar beam and ensure consistent detection. It is important to avoid mounting the transducer in the path of the propeller on single-drive vessels. The transducer should be mounted behind the boat for accurate readings.
When mounting the transducer on a trolling motor, there are a few options to consider. One option is to use a perspective mount, which provides a good viewing angle and allows for adjustments. Another option is to use a ram mount, which provides stability and can be easily adjusted.
When installing Garmin Livescope, there are several steps to follow. These include cable extension, fish tape and wire installation, attaching the transducer cable, and tightening bolts. It is also important to consider graph mounting options and the ratings of the deep cycle battery.
Overall, it is essential to carefully follow installation instructions provided by Garmin to ensure the best performance and avoid damage to your boat.

Credit: www.facebook.com
Panoptix Livescope Installation Instructions
When installing Garmin Livescope, it’s crucial to follow Garmin’s detailed installation instructions to ensure optimal performance and avoid potential damage to your boat. Mounting the transducer as close to the center line of the boat as possible is recommended to prevent interference with the sonar beam. Additionally, on single-drive vessels, it’s essential to avoid mounting the transducer in the path of the propeller. Proper cable extension, wire attachment, and careful tightening of bolts are crucial steps in the installation process. Mounting options for both the transducer and the graph should be considered for maximum efficiency. It’s also essential to pay attention to the placement of the deep cycle battery and its ratings. For a more detailed guide, you can refer to the Panoptix LiveScope installation instructions provided by Garmin. Following these instructions will ensure a successful installation and the best performance for your Garmin Livescope system.
Updating Garmin Chartplotter Software
To install Garmin Livescope on your boat, follow these step-by-step instructions. First, extend the cable and secure it using fish tape and wire. Then, attach the transducer cable and mount it using a ram mount. Finally, tighten the bolts and consider different options for graph mounting.
Updating Garmin Chartplotter Software Updating the software on your Garmin chartplotter is essential to ensure optimal performance and access to the latest features. The importance of software updates cannot be overstated as they often include bug fixes, security enhancements, and compatibility improvements. To update the sonar software on your Garmin device, follow these steps: 1. Connect your chartplotter to a stable internet connection. 2. Navigate to the software update page on the Garmin website. 3. Download the latest software update file for your specific device model. 4. Transfer the update file to an SD card. 5. Insert the SD card into your chartplotter. 6. Follow the on-screen prompts to initiate the software update process. 7. Wait for the update to complete and then restart your device. By regularly updating your Garmin chartplotter software, you can ensure a smooth and reliable sonar experience. It is recommended to check for software updates periodically to take advantage of the latest features and improvements.Frequently Asked Questions For How To Install Garmin Livescope
What Do I Need To Install Livescope?
To install LiveScope, you will need the LiveScope system, a mounting kit, a compatible Garmin device, and a power source. Follow the installation instructions to ensure optimal performance. Be sure to mount the transducer as close to the boat’s centerline as possible for best results.
Where Is The Best Place To Mount A Garmin Livescope Transducer?
The best place to mount a Garmin LiveScope transducer is as close to the center line of the boat as possible. Avoid mounting it in the path of the propeller to ensure consistent detection.
How Far Should A Livescope Transducer Be From The Trolling Motor?
Mount the LiveScope transducer as close to the center line of the boat as possible to avoid interference and inconsistent detection. Do not mount it in the path of the propeller on single-drive vessels.
How Do You Mount A Livescope On A Trolling Motor?
To mount a LiveScope on a trolling motor, attach the transducer near the center line of the boat, away from the propeller. Follow manufacturer guidelines for installation. You may use mounts and extend cables for proper positioning. Watch instructional videos for a step-by-step guide.
Conclusion
Innovating your fishing experience with Garmin Livescope is an investment worth making. The proper installation process ensures optimal performance and durability. By adhering to the manufacturer’s guidelines, positioning the transducer and securing the wiring, you can unlock the full potential of this game-changing technology.
Elevate your fishing endeavors with Garmin Livescope today!